How to run LDP and DS (Directory Services) Family tools without installing RSAT Package
WaheGuru G Ka Khalsa, WaheGuru G Ki Fateh
|
… Intended Audience & Prerequisite Knowledge: Intended Audience: This Post is for Audience:
Prerequisite Knowledge:
… |
In this Post, we highlight a way to run the common ADDS tools such LDP.exe and DS Family of tools such as DSadd.exe | DSquery.exe (which are only available once we have RSAT Tools [with starting of Windows 6.x releases]) without installing RSAT Tools, and run them like Portable tools.
In order to run these Tools, we need to copy these Tools images (Binary EXE files) from an existing System (with same architecture) and paste those EXE files under %SystemRoot%\System32. We also need to copy the associated Language files (MUI) of these binary files under %SystemRoot%\System32\en-US (where is en-US is your System Locale). For your Convenience, you can download LDP and DS Tools from the URLs shown below. We provide both 32 and 64 Bit images and their associated Language files in discrete 7z archive files (extractable using 7z/Winrar).
| Note: Now if you are trying to run 32Bit images on a 64Bit System (provided WOW64 is working), then you need to copy the 32Bit Images under %SystemRoot%\SysWow64 and their associated Language files (MUI) under %SystemRoot%\SysWow64\en-US |

ADTools-CopiedFiles
The Language files dependency of these Binary Images was discovered using Sysinternal’s Procmon, as shown below:

ADTools-Procmon-UnSatisfiedLanguageFileDependency
Now if we try to run LDP without copying its associated Language MUI file, them we will get caution prompt stating “Unable to create new document”, as shown below & LPD won’t work.

ADTools-WithoutLanguageFiles
And if we try to run DS Tools without copying their associated Language MUI files, then DS tools won’t show any output when executed. So, we need to their associated Language MUI files prior to executing them.
Hope this helps and Cheers ![]() | Your feedback is highly appreciated.
| Your feedback is highly appreciated.
WaheGuru G Ka Khalsa, WaheGuru G Ki Fateh
Copyright © 2014
For copyright purposes, VirtualizationMaximus.com is not in the public domain. The fact that this blog owner publishes an RSS feed does not grant any rights for republication or re-use of the material except in the manner described below.
All content in this blog created by the blog owner and his guest authors is the property of the blog owner and his guest authors and protected by international copyright laws and cannot be stored on any retrieval system, reproduced, reposted, displayed, modified or transmitted in any form, electronic or otherwise without written permission of the copyright owner except as noted below.
A brief excerpt of content that does not exceed 128 words or 512 characters may be quoted as long as a link is provided back to the source page on this blog and authorship is properly attributed.
Run Replmon on Windows Server 2008 / R2, 2012 / R2, Windows 7, 8 / 8.1 without installing Windows Server 2003 Support Tools
WaheGuru G Ka Khalsa, WaheGuru G Ki Fateh
|
… Intended Audience & Prerequisite Knowledge: Intended Audience: This Post is for Audience:
Prerequisite Knowledge:
… |
In this article, we will demonstrate method by which you can run REPLMON (Replication Monitor – FrondEnd to command line replication admin – repadmin.exe) without installing Window Server 2003 Support tools. Replmon is a powerful Directory Services replication FrontEnd tool which help to visualize the AD Structure,Naming Contexts (Directory Partitions) and much more – in essence, its a much needed tool in order to grasp ADDS replication basics.
Using the below shown method, we can run REPLMON across any Windows 5.x or 6.x releases (such as Windows Server 2008/R2, Windows Server 2012/R2 | Windows 7, Windows 8) like a Portable tool.
In order to run REPLMON, we first need to copy all of the replmon files (REPLMON has been released for 32Bit architecture only) in the 7z archive in the below noted paths. This 7z archive includes REPLMON binary image and its DLL and OCX files (dependencies). We need to copy all of the OCX and DLL files (extracted from archive) under
- %SystemRoot%\System32 if your OS is 32 Bit
- %SystemRoot%\SysWOW64 if your OS is 64 Bit
We need to copy REPLMON.exe under %SystemRoot%\System32 for 32 or 64 Bit OS (in order to get REPLMON.exe image under our %PATH%).
Click HERE to download Replmon32Bit 7z Archive.
After copying we need to register all of the pasted OCX and DLL files using regsvr32.
#cd %SystemRoot%\SysWOW64 | if your OS is 64Bit
#regsvr32 comctl32.ocx
#regsvr32 comdlg32.dll
#regsvr32 iadstools.dll
#regsvr32 tabctl32.ocx
#cd %SystemRoot%\System32 | if your OS is 32Bit
#regsvr32 comctl32.ocx
#regsvr32 comdlg32.dll
#regsvr32 iadstools.dll
#regsvr32 tabctl32.ocx
After registering, we can run replmon straightaway from COMMAND LINE / RUN (i.e. from our %PATH%). Below shown Screenshot shows method adopted for 64 Bit OS in order to run REPLMON.

Hope this helps and Cheers ![]() | Your feedback is highly appreciated.
| Your feedback is highly appreciated.
WaheGuru G Ka Khalsa, WaheGuru G Ki Fateh
Copyright © 2014
For copyright purposes, VirtualizationMaximus.com is not in the public domain. The fact that this blog owner publishes an RSS feed does not grant any rights for republication or re-use of the material except in the manner described below.
All content in this blog created by the blog owner and his guest authors is the property of the blog owner and his guest authors and protected by international copyright laws and cannot be stored on any retrieval system, reproduced, reposted, displayed, modified or transmitted in any form, electronic or otherwise without written permission of the copyright owner except as noted below.
A brief excerpt of content that does not exceed 128 words or 512 characters may be quoted as long as a link is provided back to the source page on this blog and authorship is properly attributed.
Active Directory – ADDS – Sites – WAN Links – Practical Simulation with VMware Workstation – InsideOut – Part I
WaheGuru G Ka Khalsa, WaheGuru G Ki Fateh
|
… Intended Audience & Prerequisite Knowledge: Intended Audience: This Post is for Audience:
Prerequisite Knowledge:
… |
In this Post, we highlight a way to Simulate ADDS Site Links in a Virtual LAB Setup using VMware Workstation as Hypervisor.
This Post has been divided into Three Parts.
Part I details Design, Topology Setup and Configuration of the following:
- Active Directory (design only)
- VMware Workstation and LAN Segments
- IP Subnets – WAN and LAN Subnets
- Router Interfaces Setup and Routing Protocol – OSPF
- Systems/Hosts
Part II will brief on how to proceed with ADDS and DNS Server Roles Installation (using a Service Account / Delegated Account — rather than using Forest Root Administrator Account).
Part III will focus on following:
- ADDS Intrasite v/s Intersite Replication.
- Benefits of setting up Explicit Sites in AD i.e. InterSite.
- Dynamic ADDS Connection Objects according to Declared IP SiteLinks Attributes, Replication Path and IP SiteLinks Briding.
- RODC in a Remote Branch Office Scenario and Replication.
Below highlighted is our Topology Visual Prototype:

ADDS Site Links Simulation – Network and Systems – Visual Prototype – 01
Our Systems – Domain Configuration Matrix is as follows:
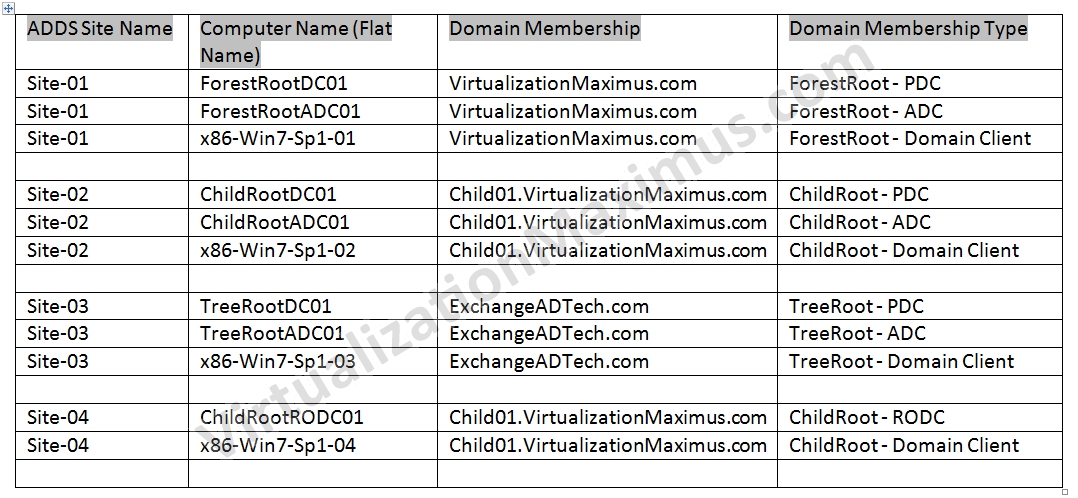
Systems Domain Configuration Matrix – 01
First we Setup the listed number of Virtual Machines – as highlighted in the Visual Prototype – and each ADDS Site is equipped with the following (except SITE-04 – in which only a single RODC DC exists):
- One RRAS Router
- TWO Writable Domain Controllers (ADC and PDC)
- One Domain Client
In SITE-04, we have deployed as follows:
- One RRAS Router
- One Read Only Domain Controller (RODC)
- One Domain Client Router
In VMware Workstation, our LAB looks like:
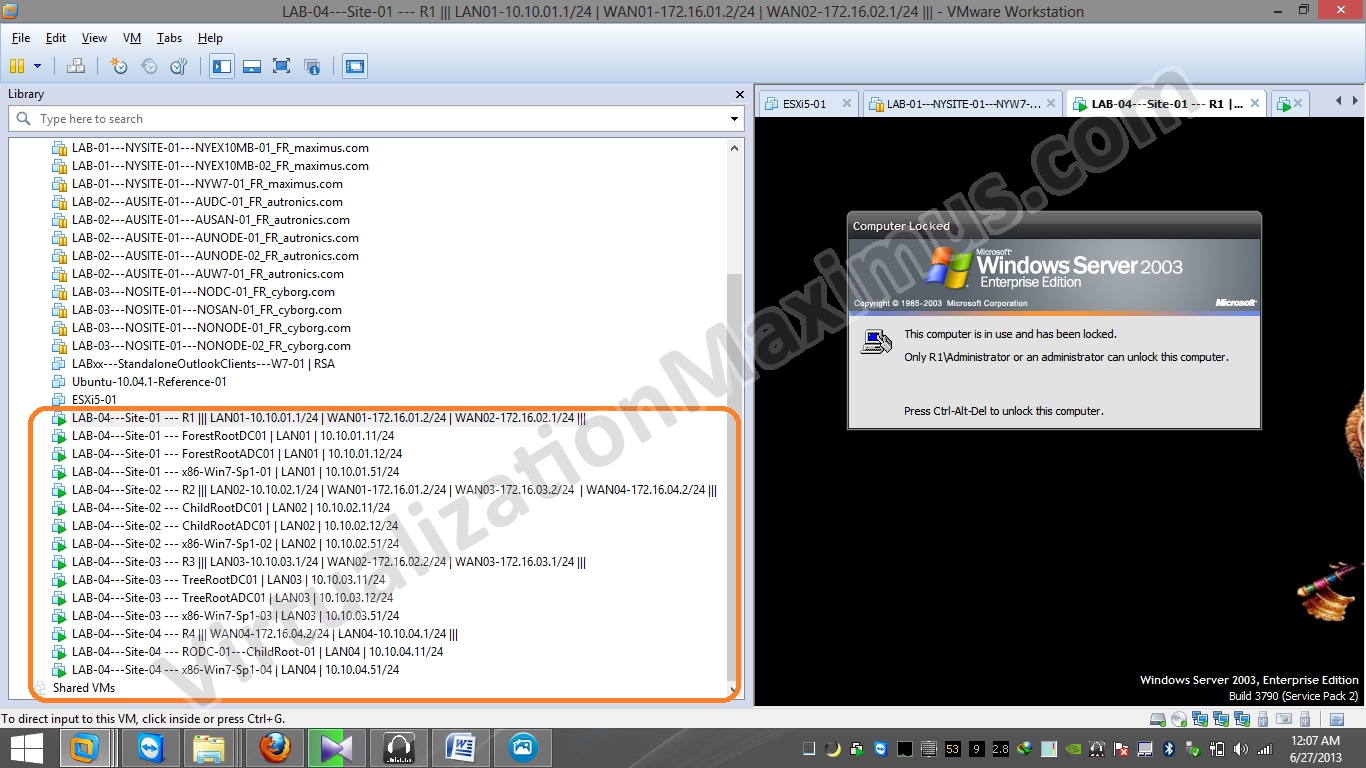
ADDS Site Links Simulation – Network and Systems – Visual Prototype – VMware Workstation – 01
Below we List our Virtual Machines Directory Hierarchy and VMs File System (Disk Space) Utilization on Host System using Tree command (ASCII Text) and TreeView (Graphical), so that we can have idea of Disk Sizing of these VMs.

ADDS Site Links Simulation – Network and Systems – Directory Hierarchy – 01
We Connect all of the Virtual Machines Ethernet Interfaces using VMware LAN Segments and don’t use the Usual VMnet Switches – due to below stated reasons.
LAN Segments provide us discrete BroadCast Domain (as with VLANs), so we used VMware LAN Segments instead of the usual VMnet Switches – as we seek Complete Network Isolation among Virtual Machines Guests, and this is particularly important if we looking to mimic WAN Links as close as possible.
As per VMware Workstation Product Documentation
“When you select a LAN segment, the virtual machine uses a private
network that can be shared with other virtual machines. LAN segments
are useful for multitier testing, network performance analysis,
and situations where virtual machine isolation are important.”
We have defined a Total of 8 LAN Segments – out of which, 4 will be used for Site Local Communication (LAN01, LAN02, LAN03 and LAN04) and rest 4 will be used for setting up Ethernet Based WAN Links (WAN01, WAN02, WAN3 and WAN04).

ADDS Site Links Simulation – Network and Systems – VMware LAN Segments – 01
Below listed are defined LAN Segments with their Associated Configuration:
| Site Name | Site-01 | Site-02 | Site-03 | Site-04 |
| Local Network – LAN Segment | LAN01 | LAN02 | LAN03 | LAN04 |
| IP Subnet / CIDR Bits | 10.10.01.0/24 | 10.10.02.0/24 | 10.10.03.0/24 | 10.10.04.0/24 |
| Default Gateway | 10.10.01.1/24 | 10.10.02.1/24 | 10.10.03.1/24 | 10.10.04.1/24 |
Below listed are defined WAN Segments with their Associated Configuration:
| WAN Segment | WAN01 | WAN02 | WAN03 | WAN04 |
| IP Subnet / CIDR Bits | 172.16.01.0/24 | 172.16.02.0/24 | 172.16.03.0/24 | 172.16.04.0/24 |
| Bandwidht(Incoming and Outgoing 1:1) | Leased Line T1 (1.544 Mbps) | Cable 4 Mbps | Leased Line T3 (45 Mbps) | Cable 10 Mbps |
| Packet Loss (Incoming and Outgoing 1:1) | 1% | 1% | 1% | 1% |
Default Gateway in WAN Segments config is N/A because we will be using Dynamic Routing Protocol – OSPF.
There are Four RRAS Routers in our Setup – namely R1 | R2| R3 | R4.
Routers Network Interfaces IP Configuration Matrix is listed below:

Routers Interfaces IP Configuration Matrix – 01
R1 is equipped with Three Ethernet Cards – which have been labelled as LAN01 | WAN01 | WAN02 and these Ethernet Cards are Connected to LAN01 | WAN01 | WAN02 Segments respectively – as shown below:
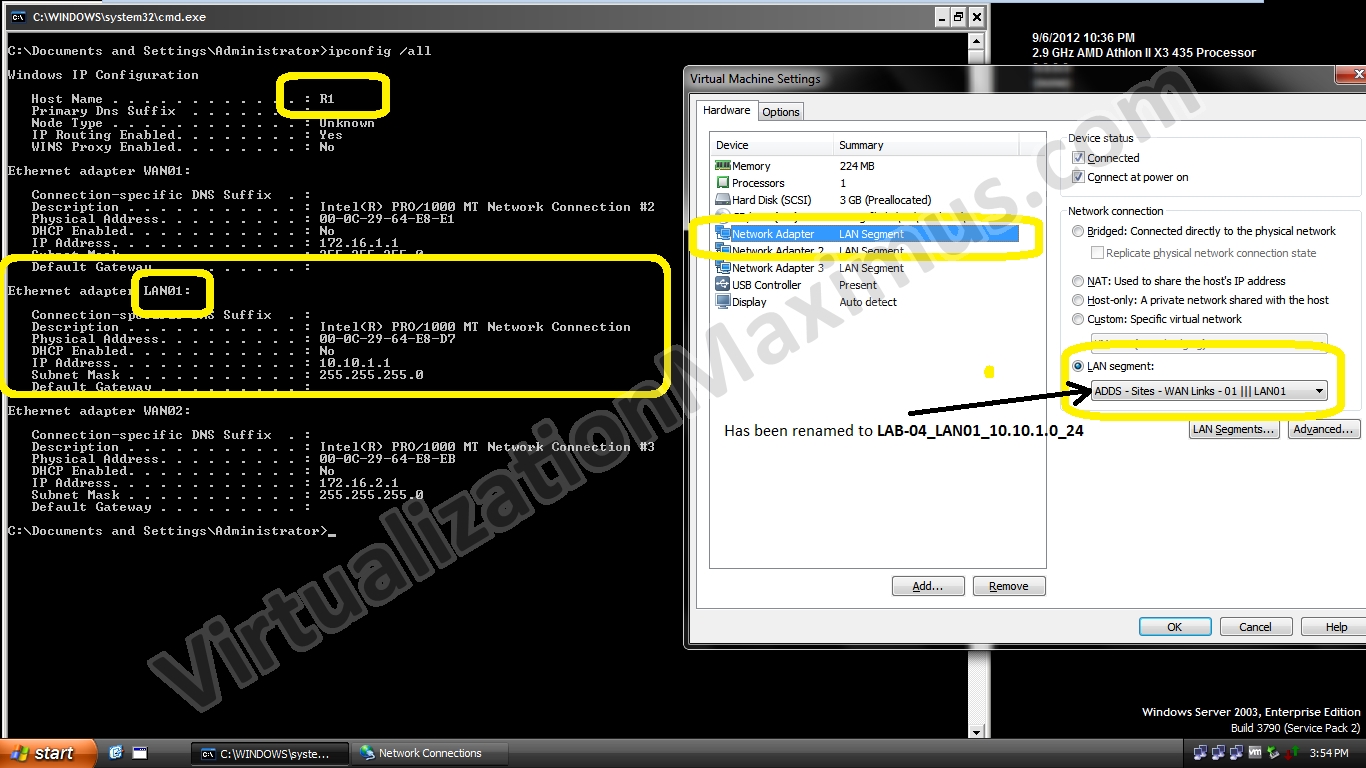
R1-LAN01
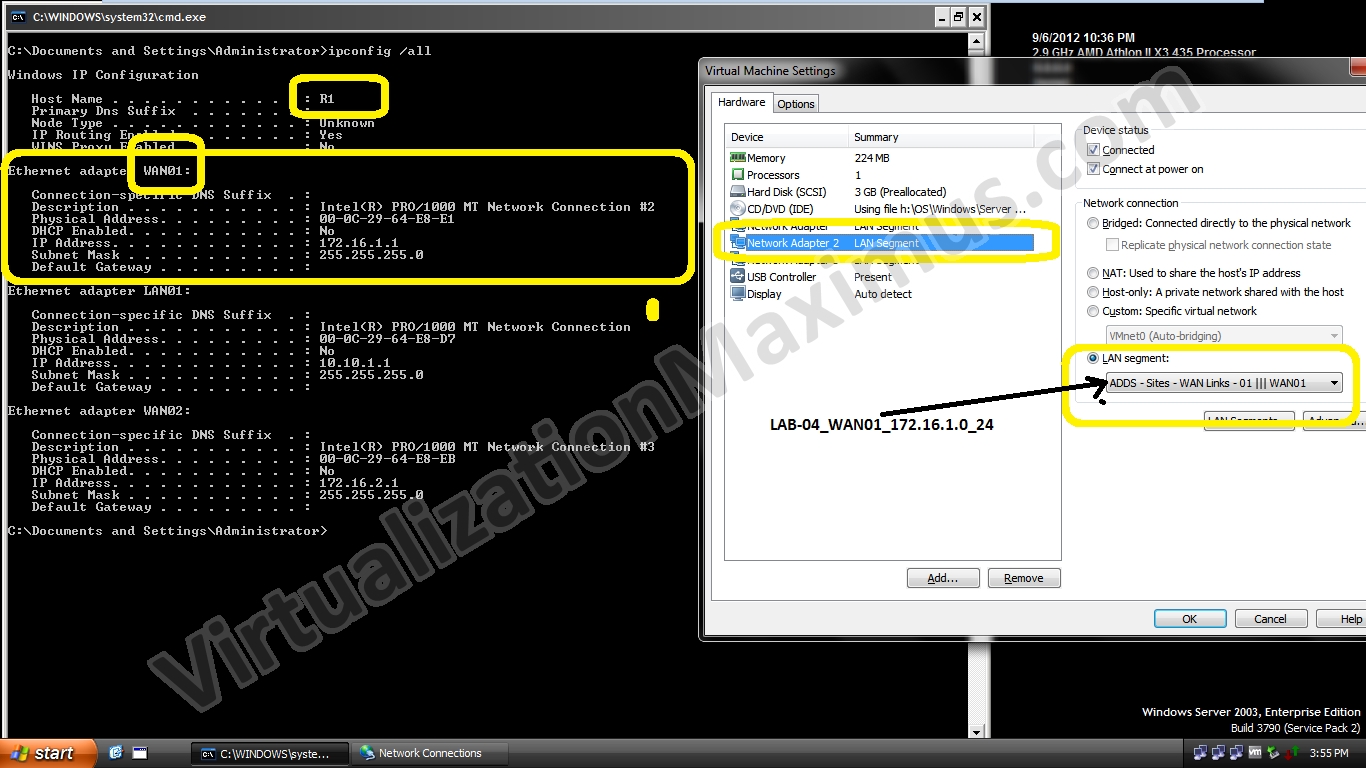
R1-WAN01

R1-WAN02
In our Setup, if the Network interface in the NETWORK CONNECTIONS (ncpa.cpl) has been named as LAN01 then it means that Network Interface Link is connected to LAN01 LAN Segment.
After viewing these ScreenShots – refer back to main Visual Prototype image – to Understand How Router Network Interfaces have been configured.
Below we dump “ipconfig /all” from R1 | R2 | R3 and R4 – Routers – to highlight Network Interfaces IP Configuration.
R1
Windows IP Configuration

   Host Name . . . . . . . . . . . . : R1
   Primary Dns Suffix  . . . . . . . :
   Node Type . . . . . . . . . . . . : Unknown
   IP Routing Enabled. . . . . . . . : Yes
   WINS Proxy Enabled. . . . . . . . : No

Ethernet adapter WAN01:

   Connection-specific DNS Suffix  . :
   Description . . . . . . . . . . . : Intel(R) PRO/1000 MT Network Connection #2
   Physical Address. . . . . . . . . : 00-0C-29-64-E8-E1
   DHCP Enabled. . . . . . . . . . . : No
   IP Address. . . . . . . . . . . . : 172.16.1.1
   Subnet Mask . . . . . . . . . . . : 255.255.255.0
   Default Gateway . . . . . . . . . :

Ethernet adapter LAN01:

   Connection-specific DNS Suffix  . :
   Description . . . . . . . . . . . : Intel(R) PRO/1000 MT Network Connection
   Physical Address. . . . . . . . . : 00-0C-29-64-E8-D7
   DHCP Enabled. . . . . . . . . . . : No
   IP Address. . . . . . . . . . . . : 10.10.1.1
   Subnet Mask . . . . . . . . . . . : 255.255.255.0
   Default Gateway . . . . . . . . . :

Ethernet adapter WAN02:

   Connection-specific DNS Suffix  . :
   Description . . . . . . . . . . . : Intel(R) PRO/1000 MT Network Connection #3
   Physical Address. . . . . . . . . : 00-0C-29-64-E8-EB
   DHCP Enabled. . . . . . . . . . . : No
   IP Address. . . . . . . . . . . . : 172.16.2.1
   Subnet Mask . . . . . . . . . . . : 255.255.255.0
   Default Gateway . . . . . . . . . :
R2
Windows IP Configuration

   Host Name . . . . . . . . . . . . : R2
   Primary Dns Suffix  . . . . . . . :
   Node Type . . . . . . . . . . . . : Unknown
   IP Routing Enabled. . . . . . . . : Yes
   WINS Proxy Enabled. . . . . . . . : No

Ethernet adapter WAN01:

   Connection-specific DNS Suffix  . :
   Description . . . . . . . . . . . : Intel(R) PRO/1000 MT Network Connection #2
   Physical Address. . . . . . . . . : 00-0C-29-B1-01-BE
   DHCP Enabled. . . . . . . . . . . : No
   IP Address. . . . . . . . . . . . : 172.16.1.2
   Subnet Mask . . . . . . . . . . . : 255.255.255.0
   Default Gateway . . . . . . . . . :

Ethernet adapter LAN02:

   Connection-specific DNS Suffix  . :
   Description . . . . . . . . . . . : Intel(R) PRO/1000 MT Network Connection
   Physical Address. . . . . . . . . : 00-0C-29-B1-01-B4
   DHCP Enabled. . . . . . . . . . . : No
   IP Address. . . . . . . . . . . . : 10.10.2.1
   Subnet Mask . . . . . . . . . . . : 255.255.255.0
   Default Gateway . . . . . . . . . :
   NetBIOS over Tcpip. . . . . . . . : Disabled

Ethernet adapter WAN03:

   Connection-specific DNS Suffix  . :
   Description . . . . . . . . . . . : Intel(R) PRO/1000 MT Network Connection #3
   Physical Address. . . . . . . . . : 00-0C-29-B1-01-C8
   DHCP Enabled. . . . . . . . . . . : No
   IP Address. . . . . . . . . . . . : 172.16.3.2
   Subnet Mask . . . . . . . . . . . : 255.255.255.0
   Default Gateway . . . . . . . . . :

Ethernet adapter WAN04:

   Connection-specific DNS Suffix  . :
   Description . . . . . . . . . . . : Intel(R) PRO/1000 MT Network Connection #4
   Physical Address. . . . . . . . . : 00-0C-29-B1-01-D2
   DHCP Enabled. . . . . . . . . . . : No
   IP Address. . . . . . . . . . . . : 172.16.4.2
   Subnet Mask . . . . . . . . . . . : 255.255.255.0
   Default Gateway . . . . . . . . . :
R3
Windows IP Configuration

   Host Name . . . . . . . . . . . . : R3
   Primary Dns Suffix  . . . . . . . :
   Node Type . . . . . . . . . . . . : Unknown
   IP Routing Enabled. . . . . . . . : Yes
   WINS Proxy Enabled. . . . . . . . : No

Ethernet adapter WAN02:

   Connection-specific DNS Suffix  . :
   Description . . . . . . . . . . . : Intel(R) PRO/1000 MT Network Connection #2
   Physical Address. . . . . . . . . : 00-0C-29-21-A4-B7
   DHCP Enabled. . . . . . . . . . . : No
   IP Address. . . . . . . . . . . . : 172.16.2.2
   Subnet Mask . . . . . . . . . . . : 255.255.255.0
   Default Gateway . . . . . . . . . :

Ethernet adapter LAN03:

   Connection-specific DNS Suffix  . :
   Description . . . . . . . . . . . : Intel(R) PRO/1000 MT Network Connection
   Physical Address. . . . . . . . . : 00-0C-29-21-A4-AD
   DHCP Enabled. . . . . . . . . . . : No
   IP Address. . . . . . . . . . . . : 10.10.3.1
   Subnet Mask . . . . . . . . . . . : 255.255.255.0
   Default Gateway . . . . . . . . . :

Ethernet adapter WAN03:

   Connection-specific DNS Suffix  . :
   Description . . . . . . . . . . . : Intel(R) PRO/1000 MT Network Connection #3
   Physical Address. . . . . . . . . : 00-0C-29-21-A4-C1
   DHCP Enabled. . . . . . . . . . . : No
   IP Address. . . . . . . . . . . . : 172.16.3.1
   Subnet Mask . . . . . . . . . . . : 255.255.255.0
   Default Gateway . . . . . . . . . :
R4
Windows IP Configuration

   Host Name . . . . . . . . . . . . : R4
   Primary Dns Suffix  . . . . . . . :
   Node Type . . . . . . . . . . . . : Unknown
   IP Routing Enabled. . . . . . . . : Yes
   WINS Proxy Enabled. . . . . . . . : No

Ethernet adapter LAN04:

   Connection-specific DNS Suffix  . :
   Description . . . . . . . . . . . : Intel(R) PRO/1000 MT Network Connection
   Physical Address. . . . . . . . . : 00-0C-29-D8-71-6C
   DHCP Enabled. . . . . . . . . . . : No
   IP Address. . . . . . . . . . . . : 10.10.4.1
   Subnet Mask . . . . . . . . . . . : 255.255.255.0
   Default Gateway . . . . . . . . . :

Ethernet adapter WAN04:

   Connection-specific DNS Suffix  . :
   Description . . . . . . . . . . . : Intel(R) PRO/1000 MT Network Connection #2
   Physical Address. . . . . . . . . : 00-0C-29-D8-71-76
   DHCP Enabled. . . . . . . . . . . : No
   IP Address. . . . . . . . . . . . : 172.16.4.1
   Subnet Mask . . . . . . . . . . . : 255.255.255.0
   Default Gateway . . . . . . . . . :
Virtual Machines Naming “Description” Convention [Nomenclature] is as follows:

ADDS Site Links Simulation – Virtual Machines Naming Description Convention
Now we restrict Virtual Machines Network Interface Link Speed (for WAN Segments) as specified in Visual Prototype using “Network Adapter Advanced Settings” as seen below:
WAN01 – Bandwidth – T1 – 1.544 Mbps – 01

ADDS Site Links Simulation – Network and Systems – WAN01 – T1 – 1.544 Mbps – 01
WAN02 – Bandwidth – Cable – 4 Mbps – 01

ADDS Site Links Simulation – Network and Systems – WAN02 – Bandwidth – Cable – 4 Mbps – 01
WAN03 – Bandwidth – T3 – 45 Mbps – 01
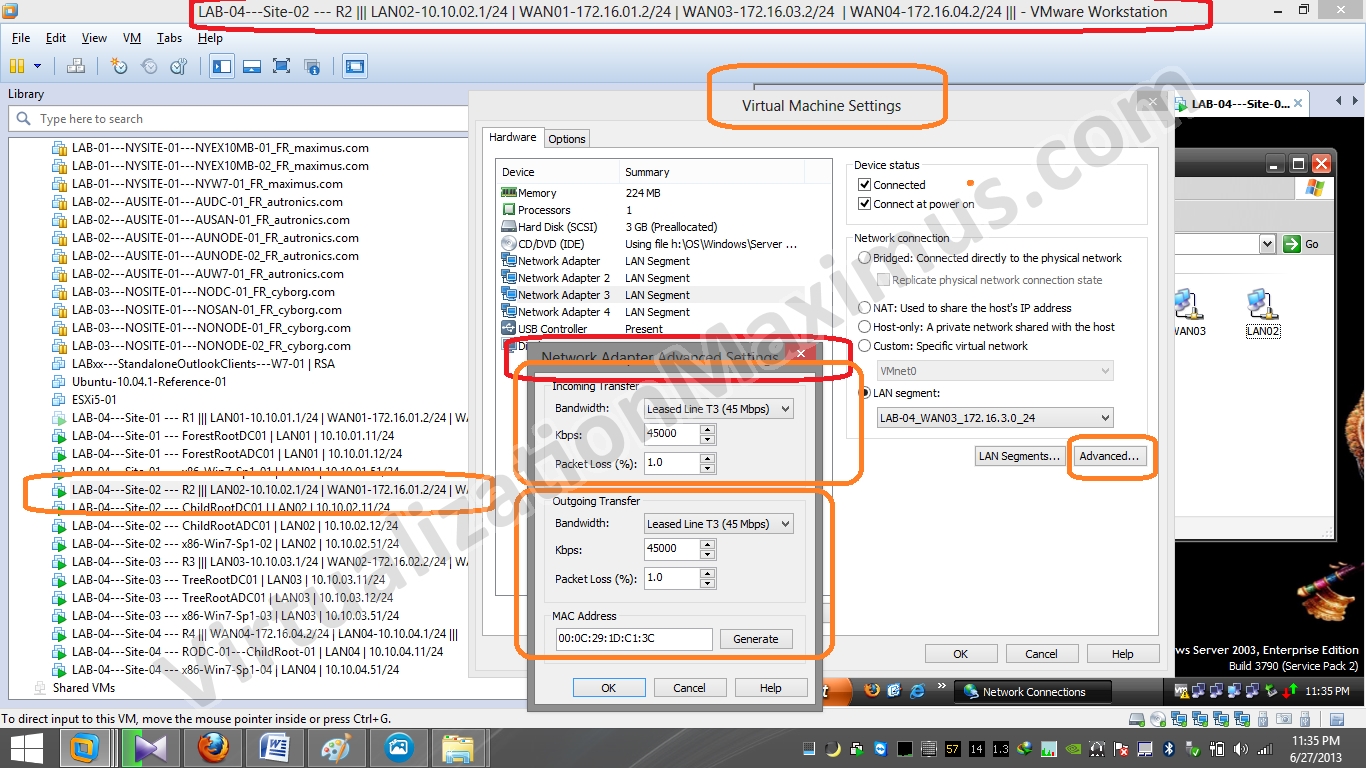
ADDS Site Links Simulation – Network and Systems – WAN03 – T3 – 45 Mbps – 01
WAN04 – Bandwidth – Cable – 10 Mbps – 01
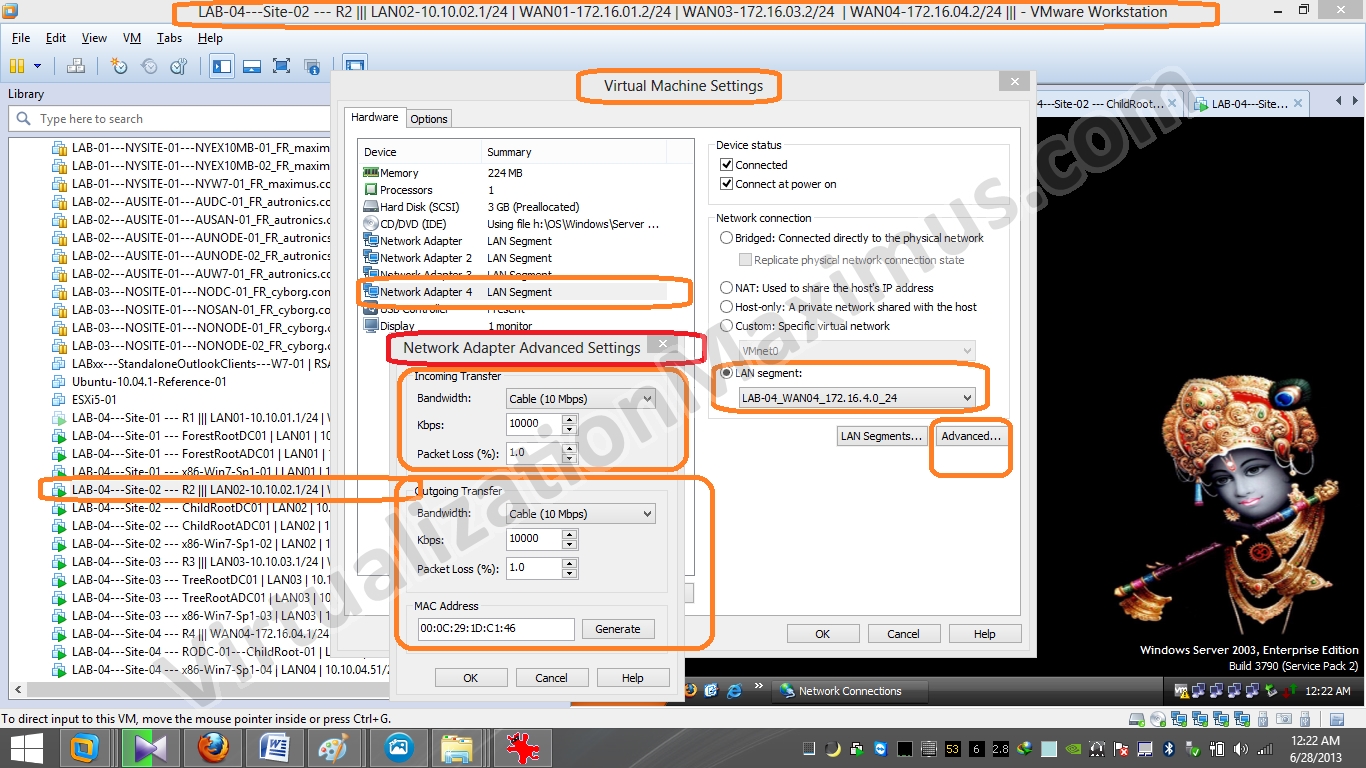
ADDS Site Links Simulation – Network and Systems – WAN04 – Bandwidth – Cable – 10 Mbps – 01
Bandwidth restriction is set on Ethernet Card Basis (unlike VMware Workstation version <= 7.x – where restriction was set on LAN Segments basis), so we need to restrict bandwidth on all the Routers WAN Interfaces – and we restrict as appropriate.
For Example – say a Router Interface 01 will be connected to WAN02 Segment – in that case – we will restrict Bandwidth to 4 Mbps – and packet loss to 1% (refer above shown Visio Diagram or WAN Segment Configuration Matrix/Table – where we listed that WAN02 Segment Interfaces will be Limited to – Cable – 4 Mbps with Packet Loss of 1%).
At last, we display Routers Network Interfaces Physical Configuration with respect to LAN Segments.
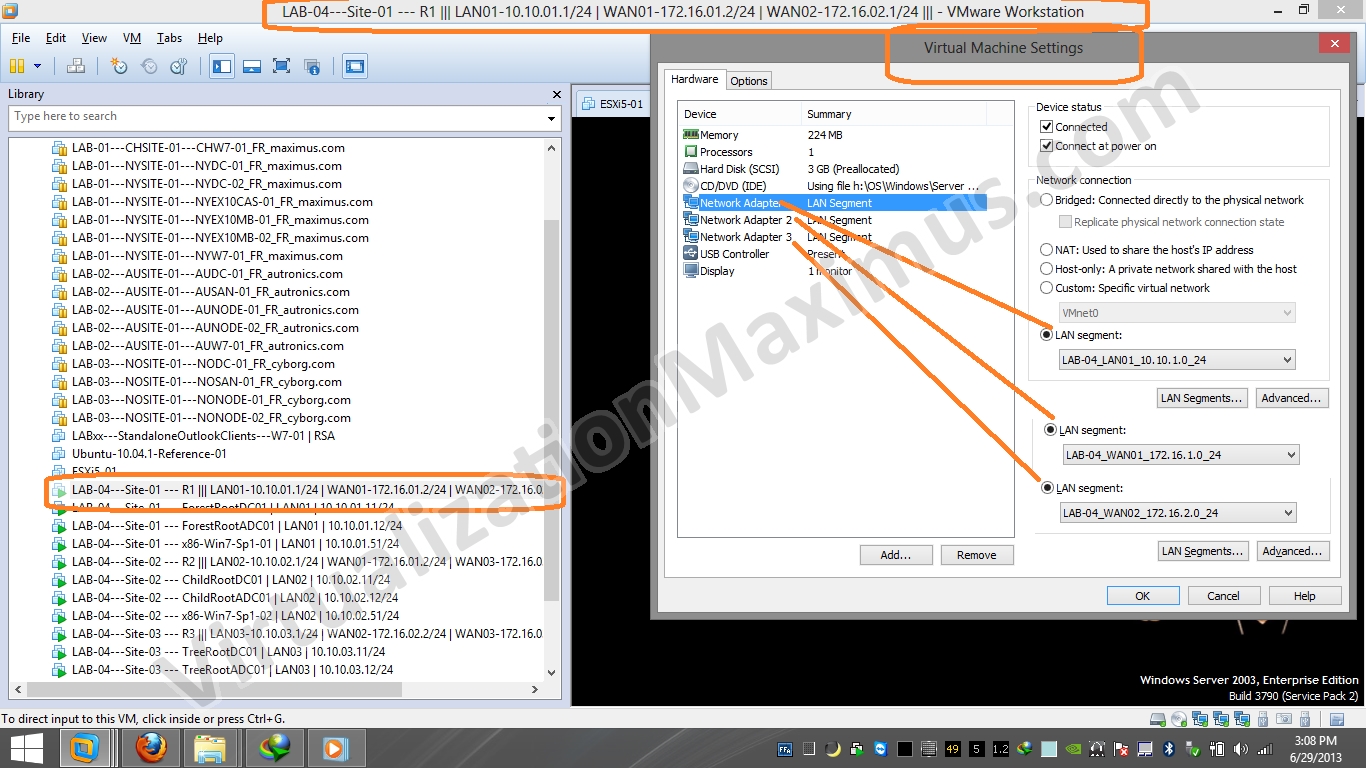
ADDS Site Links Simulation – Network and Systems – Router – R1 – Network Interfaces Config – 01

ADDS Site Links Simulation – Network and Systems – Router – R2 – Network Interfaces Config – 01

ADDS Site Links Simulation – Network and Systems – Router – R3 – Network Interfaces Config – 01
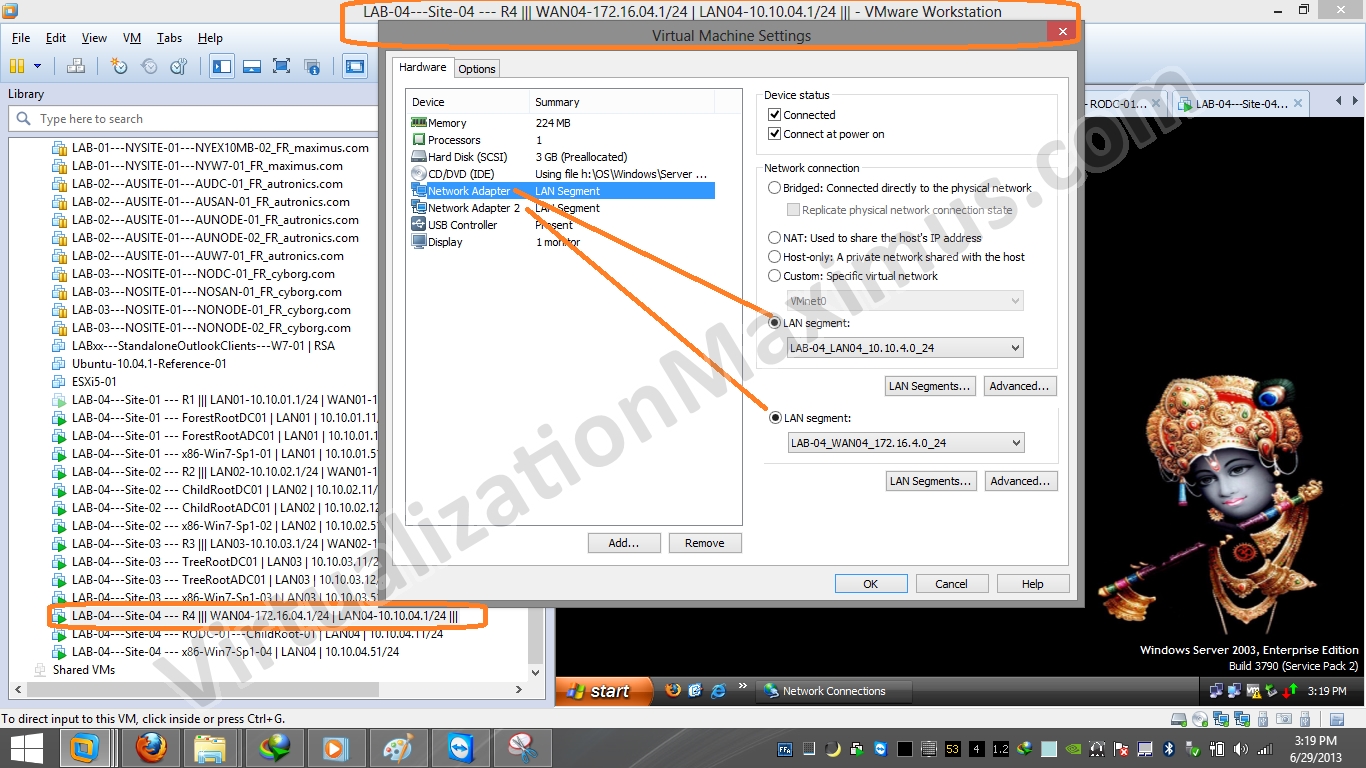
ADDS Site Links Simulation – Network and Systems – Router – R4 – Network Interfaces Config – 01
After setting up Physical (LAN Segments) and Logical (IP) Networking, we just need to enable a Dynamic Routing Protocol (we opt for OSPF) and add all Network Interfaces Interfaces – using Windows Server – RRAS Role (Routing and Remote Access – rrasmgmt.msc) on all the Routers (R1, R2, R3 and R4) – as depicted below:

ADDS Site Links Simulation – Network and Systems – Router – R1 – Network Interfaces OSPF Config – 01
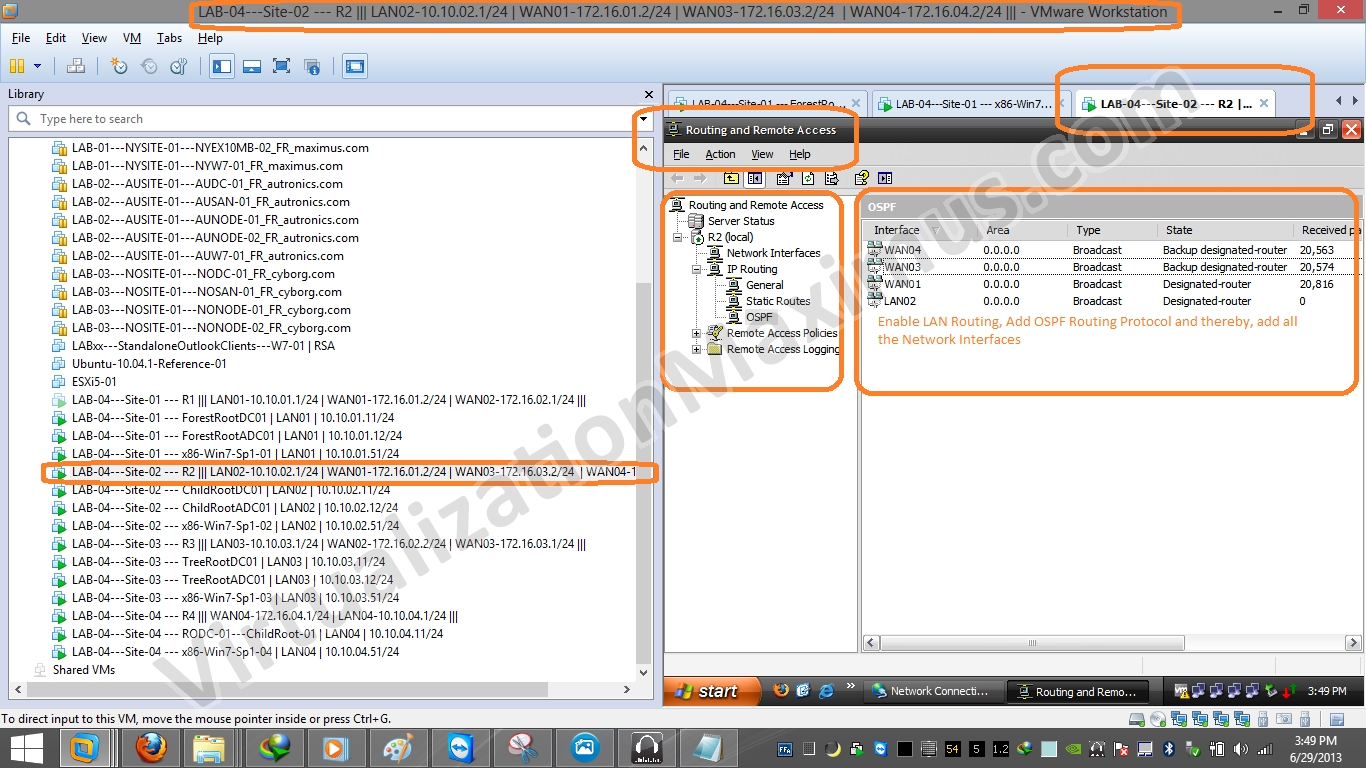
ADDS Site Links Simulation – Network and Systems – Router – R2 – Network Interfaces OSPF Config – 01
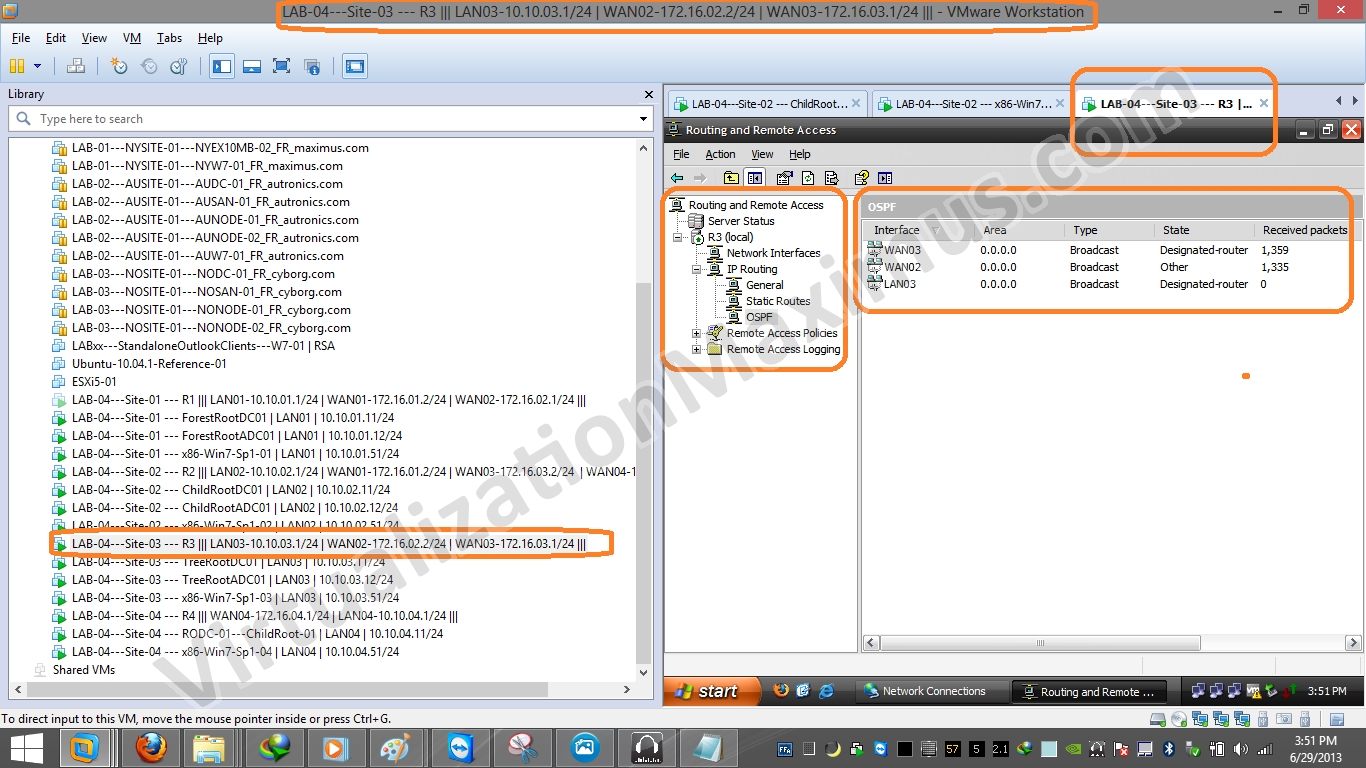
ADDS Site Links Simulation – Network and Systems – Router – R3 – Network Interfaces OSPF Config – 01

ADDS Site Links Simulation – Network and Systems – Router – R4 – Network Interfaces OSPF Config – 01
That’s all related to Design, Topology Setup and Configuration of:
- Active Directory (design only)
- VMware Workstation and LAN Segments
- IP Subnets – WAN and LAN Subnets
- Router Interfaces Setup and Routing Protocol – OSPF
- Systems/Hosts
We continue with Part II and Part III which deals with ADDS Roles Deployment, Configuration & ADDS Intersites respectively.
Hope this helps and Cheers ![]() | Your feedback is highly appreciated.
| Your feedback is highly appreciated.
WaheGuru G Ka Khalsa, WaheGuru G Ki Fateh
Copyright © 2013
For copyright purposes, VirtualizationMaximus.com is not in the public domain. The fact that this blog owner publishes an RSS feed does not grant any rights for republication or re-use of the material except in the manner described below.
All content in this blog created by the blog owner and his guest authors is the property of the blog owner and his guest authors and protected by international copyright laws and cannot be stored on any retrieval system, reproduced, reposted, displayed, modified or transmitted in any form, electronic or otherwise without written permission of the copyright owner except as noted below.
A brief excerpt of content that does not exceed 128 words or 512 characters may be quoted as long as a link is provided back to the source page on this blog and authorship is properly attributed.

